Upload and Assign Files
This guide explains how to upload data files for your ArrayExpress submission through Annotare. The upload method you choose depends on your file sizes and the number of files in your submission.
Before You Start
- File preparation: Please check the guidelines on submitting files for a microarray experiment, sequencing experiment, or array design and the accepted file formats for each.
- For example, microarray data files should not be compressed, but FASTQ files from sequencing experiments must be individually compressed using gzip or bzip2.
- File naming: Make sure file names contain only alphanumeric characters [A-Z, a-z, 0-9], underscores [_], and dots [.]. Do not use whitespaces, brackets, or other special characters.
1. Direct In-Browser Upload (Files < 1 GB)
Direct upload through the Annotare web interface is the simplest method and is suitable for individual files smaller than 1 GB. For larger files or submissions with many files, use one of the alternative upload methods described in Section 2.
How to Upload Files Directly
- In your Annotare submission, navigate to the file upload section.
- Click Upload Files...
- Select the files from your computer. You can upload multiple files at once.
- Wait for the upload to complete. The file upload pane can be accessed from all tabs, so you can continue filling in forms while files are uploading.
- Once uploaded, proceed to assign files to your samples - see Section 3.
Tip: Use time-saving features such as uploading multiple files in one go and bulk-assigning them to samples using the Paste Into Column button. (Watch a video tutorial here)
2. Upload Methods for Large Files (≥ 1 GB)
For files 1 GB or larger, or for submissions with many files (even if individual files are under 1 GB), use one of the following upload methods: FTP, Aspera, or Globus.
2.1 Globus Upload
Globus is an efficient solution for large file transfers, offering better reliability for uploading large data files. It is the recommended method for very large datasets.
Setting up a Globus Account
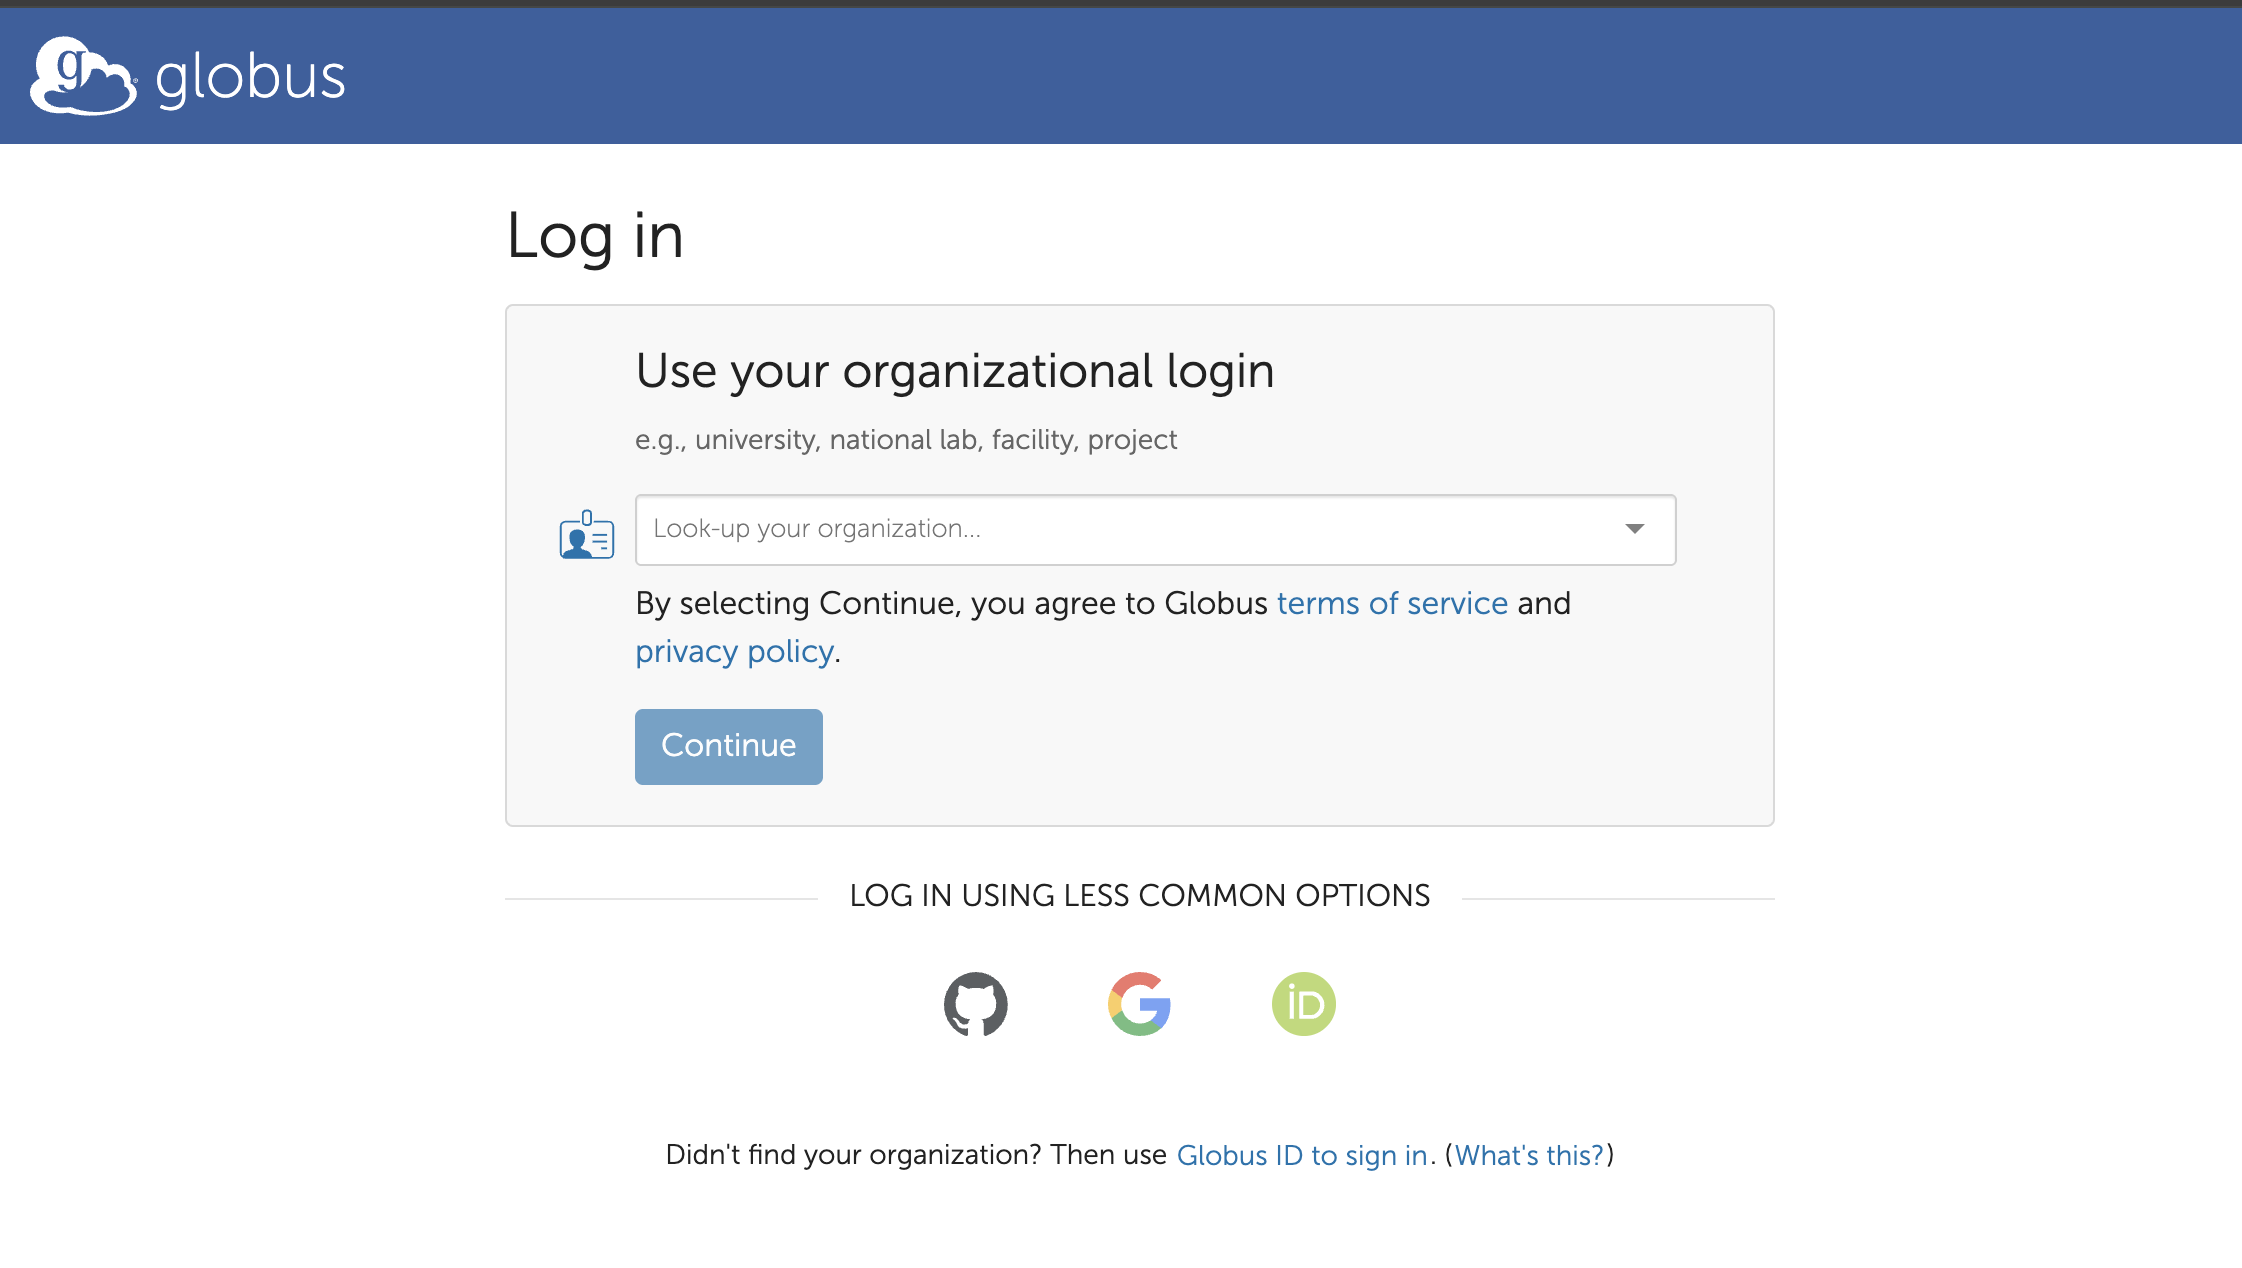
When accessing Globus for the first time, you have three authentication options:
- Organizational Login (recommended): If your organization is listed in the dropdown menu, select it and proceed with your institutional credentials.
- Google/ORCID/GitHub Account: You can authenticate using your existing Google, ORCID, or GitHub account.
- Globus ID: You can create a Globus ID by signing up and verifying your email address.
Transferring Files via Globus
Once you have a Globus account, you can transfer files using one of the following methods:
Option A: Browser Upload via Globus (for files < 1 GB)
- Open the Globus collection URL provided for your submission in Annotare.
- Click Upload and then Select Files to Upload.
- Allow authentication/consent for the Globus web app to perform HTTPS uploads.
- Select files from your local directory and start uploading.
Option B: Globus Personal Connect (recommended for files ≥ 1 GB)
This is the recommended option for transferring multiple large files.
Step 1: Install Globus Personal Connect
Download and install the Globus Personal Connect client for your operating system:
- Windows: Installation Guide
- MacOS: Installation Guide
- Linux: Installation Guide
Step 2: Set Up Your Local Collection
Follow the installation instructions to set up your local endpoint/collection.
Step 3: Transfer Files
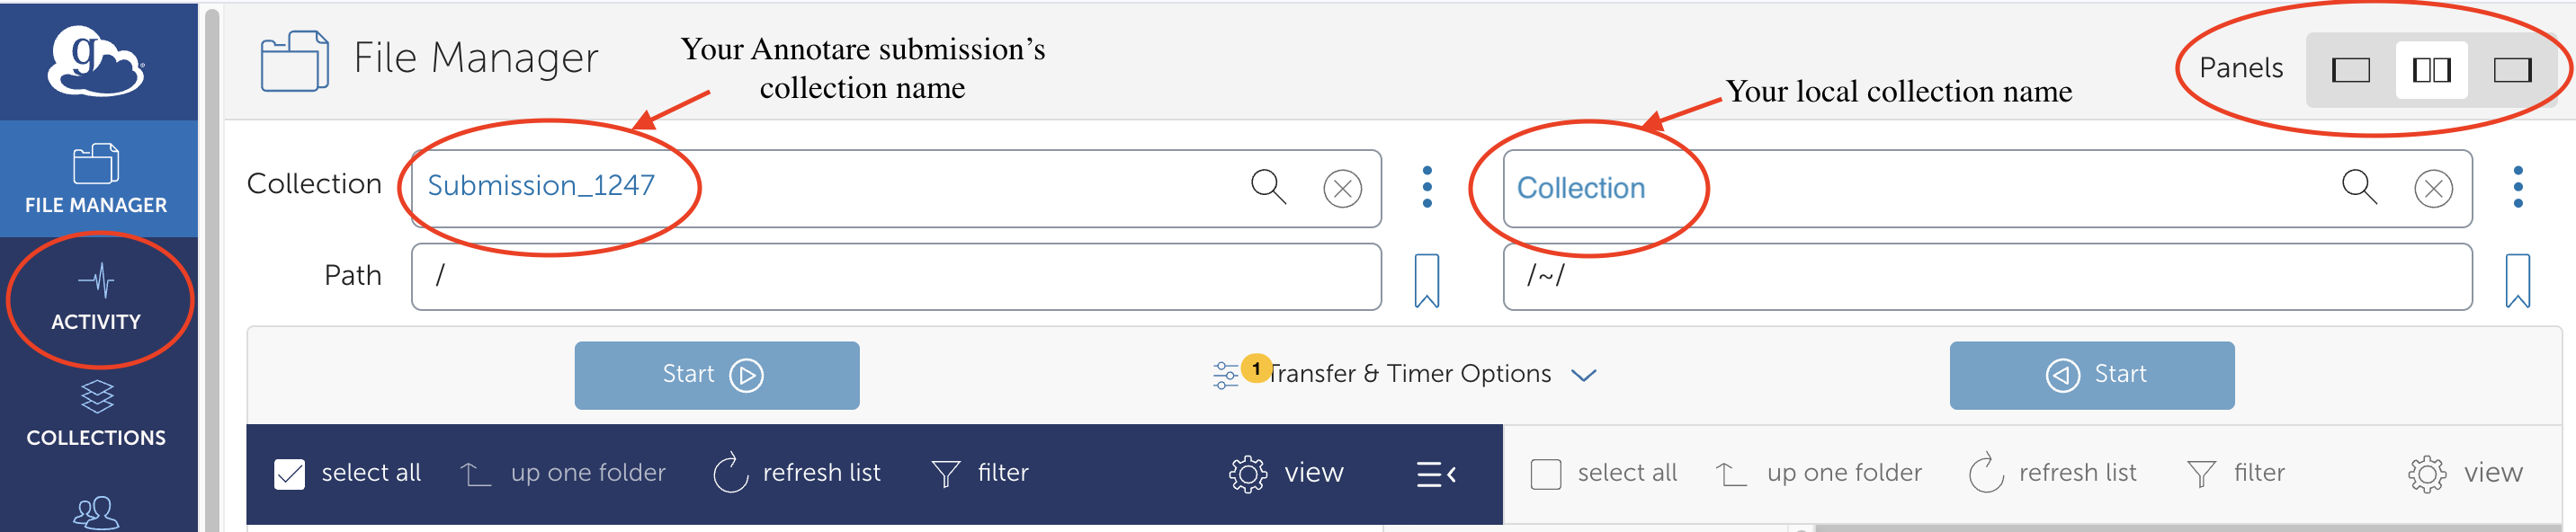
- Open the Globus collection URL provided for your submission in Annotare or https://app.globus.org/file-manager in your browser.
- In the top right corner, for Panels Select "Set two panes" option.
- In the left pane, search for and select the collection ID provided for your submission in Annotare. (This would be automatically selected if you directly open collection URL from Annotare)
- Click on the "Transfer or Sync to..." button.
- In the right pane, search for and select your local collection that you created during Globus Personal Connect setup.
- In your local collection (right pane), navigate to your local directory and select the files you want to transfer.
- Click Start button to begin the transfer task.
Important: Please select only files, not directories.
Step 4: Check Transfer Status
- After starting a transfer, click the Activity button on the left side menu.
- This displays all your active and recent transfer tasks.
- You can monitor progress, see completed transfers, and check for any errors.
- You can also cancel ongoing transfers from this screen if needed.
For more information about sharing data via Globus: https://www.globus.org/globus-connect-personal
2.2 FTP Upload
FTP (File Transfer Protocol) is a standard method for transferring files. Ensure you are connected to the internet via a physical (wired) connection rather than wireless for best results.
FTP Connection Details
Server: ftp-private.ebi.ac.uk
Username: annotare
Password: annotare1
Windows Users (FileZilla)
We recommend using FileZilla as an FTP client for Windows users. Windows File Explorer is not recommended as it may not support all FTP features and can be less secure.
- Download and install the FileZilla Client from filezilla-project.org.
- Open FileZilla and enter the following in the Quickconnect bar:
- Host:
ftp-private.ebi.ac.uk - Username:
annotare - Password:
annotare1 - Port:
21
- Host:
- Click Quickconnect.
- In the Remote site pane, navigate to your submission's subdirectory. Find the path in Annotare by clicking "FTP/Aspera upload..." (e.g.,
/prod/ibtd1rmo-20r7k3g747sup). - Drag and drop files from your local computer (left pane) to the remote server (right pane) to upload.
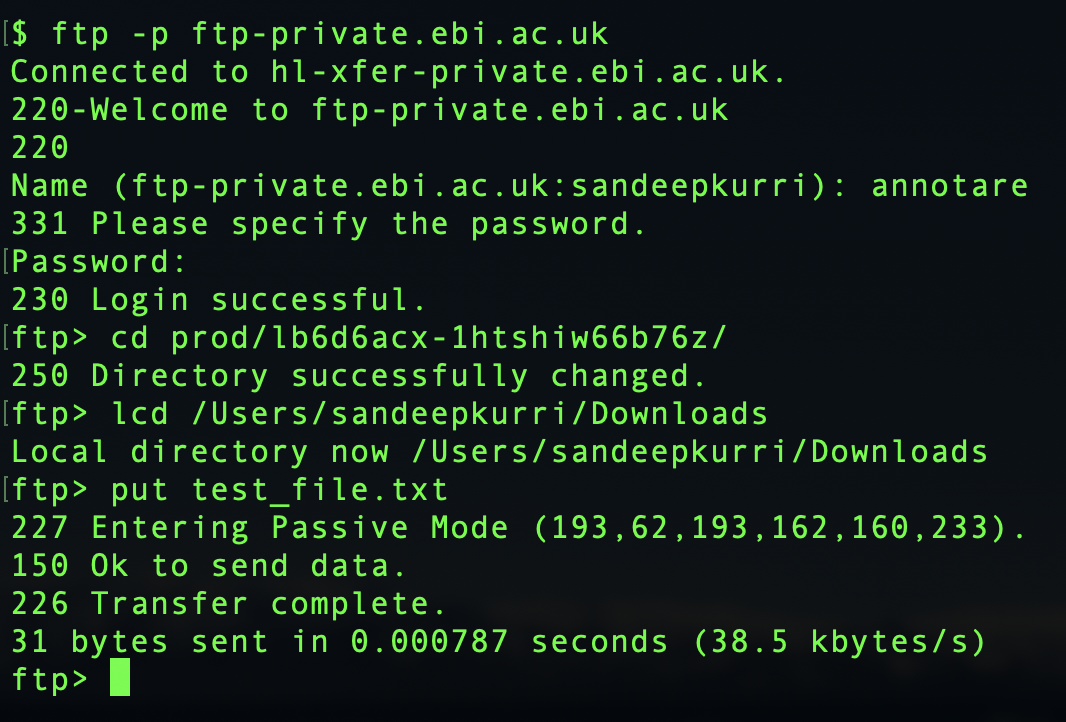
Mac/Linux/Windows Terminal Users
- Open a Terminal window and navigate to the directory containing your data files.
- Connect to the FTP server:
ftp -p ftp-private.ebi.ac.uk - Enter username
annotareand passwordannotare1 - Change to your submission's subdirectory. Find the path in Annotare by clicking "FTP upload..." (e.g.,
/prod/ibtd1rmo-20r7k3g747sup). Type:cd /prod/your-directory-name - Upload files using
put filename(single file) ormput *(multiple files). - Type
quitto exit. You will see a message confirming whether the transfer was successful.
Note for Mac users: The standard FTP client on Mac (embedded in Finder) may fail due to incompatible settings. Consider using an alternative FTP client such as CyberDuck.
2.3 Aspera Upload
Aspera is a commercial file transfer protocol that provides significantly better transfer speeds than FTP, especially over long distances. It is recommended for very large files or when FTP performance is inadequate.
Aspera Setup and Transfer
- Download the Aspera Transfer SDK: Visit the IBM Developer website and download the appropriate version for your operating system.
- Install: Unzip/untar the download into a suitable directory (e.g.,
C:\asperaon Windows or/opt/asperaon Mac/Linux). - Locate the ascp binary: Navigate to the
./aspera/bindirectory where theascpcommand-line tool is located. - Get your upload directory: In Annotare, click "FTP/Aspera upload..." to find your submission's upload directory (e.g.,
prod/abcd1efg-hijk2lmno3pqr). - Transfer files: Run the following command:
ascp -P 33001 -c aes128gcm <yourfile.txt> annotare@fasp.ebi.ac.uk:<your upload directory>/
- When prompted for a password, enter
annotare1
For more information on using Aspera, see: How to transfer files to and from EMBL-EBI using IBM Aspera (EMBL Service Now KB0011565).
2.4 Calculating MD5 Checksums
Before registering files uploaded via FTP, Aspera, or Globus, you must calculate the MD5 checksum for each file. The checksum is a hexadecimal "fingerprint" for a file (e.g., eef75461035fb66d9173799d4e26ea97). Annotare uses these checksums to verify file integrity after transfer.
You can watch a short video tutorial demonstrating how to calculate MD5 checksums for your files and use them to register your uploaded files in Annotare here.
How to calculate MD5 checksums on different platforms
Windows
Open Command Prompt or PowerShell and run:
certutil -hashfile <filename> MD5
Alternatively, use a tool such as WinMD5.
MacOS
Open Terminal and run:
md5 <filename>
For more details: Mac MD5 guide.
Linux
Open a terminal and run:
md5sum <filename>
For more details: Linux MD5 guide.
2.5 Registering Uploaded Files in Annotare
This step is required for all files uploaded via FTP, Aspera, or Globus. After transferring your files, you must register them in Annotare with their MD5 checksums so that Annotare can verify the files are present and intact.
How to Register Files
- In your Annotare submission, navigate to the "Upload and assign data files" section.
- Click the "FTP/Aspera Upload..." or "Globus Upload..." button (depending on your upload method).
- In the dialog that appears, enter the file names and their corresponding MD5 checksums.
- Click to submit/register the files.
- Annotare will verify the presence of the files on the server and validate the MD5 checksums. Once verified, the files will appear in your submission and can be assigned to samples.
.fastq.gz file) that was transferred, not the uncompressed file.
A short video tutorial demonstrating how to calculate MD5 checksums for your files and use them to register your uploaded files in Annotare is available here
Once the file registration is complete, your files will appear in the upload pane in Annotare with the status 'uploaded', which means they are ready to be assigned to samples - see Section 3.
3. Assigning Files to Samples
A submission is not complete without specifying which data file belongs to which sample. After uploading (and registering, if applicable), you must assign files to samples.
Note: Files that are not assigned to any samples are not included in the submission and carried forward to processing.
File Types
Four types of data files are distinguished:
- Raw Data File: Unprocessed data for a single sample
- Raw Matrix Data File: Unprocessed data containing multiple samples in one file
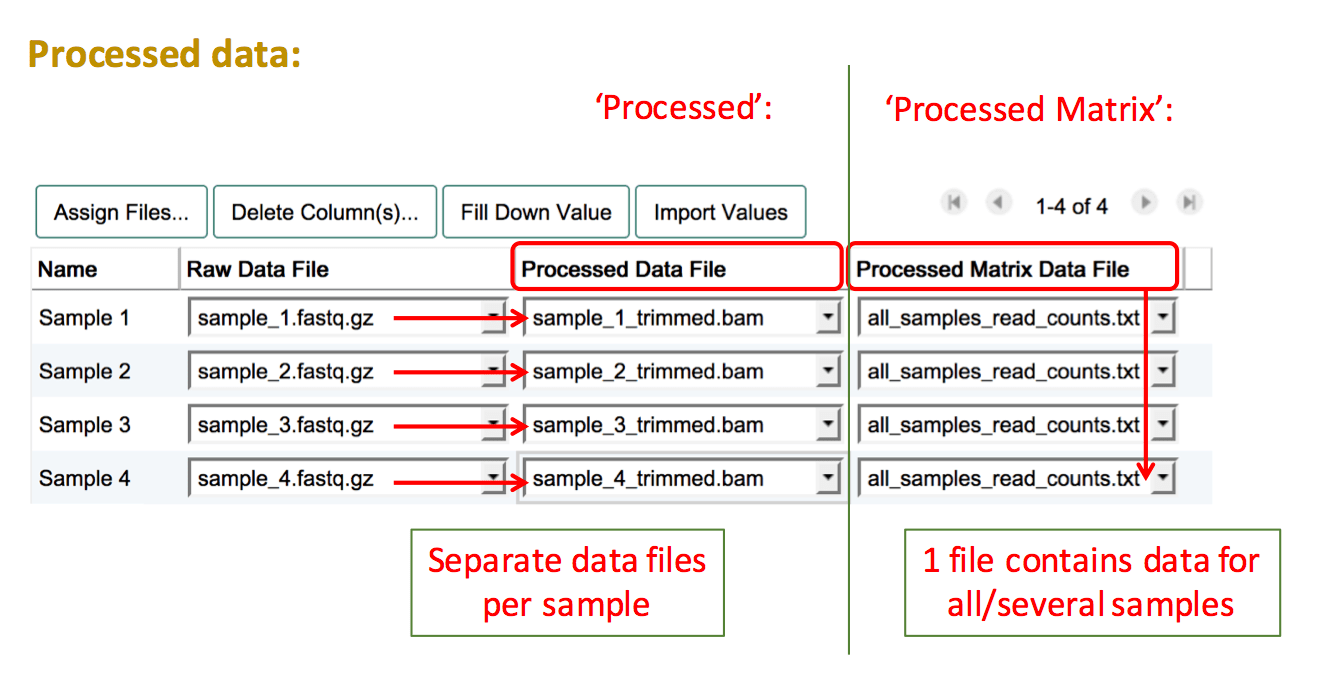
- Processed Data File: Processed/analysed data for a single sample
- Processed Matrix Data File: Processed data containing multiple samples in one file
Note: Data file types available for file assignment differ for different technology templates in Annotare.
How to Assign Files
- Click Assign Files... and choose the appropriate file category.
- Select the respective file name from the dropdown menu for each sample.
- Repeat for each data type you want to include.
- Use Fill Down Value and Paste Into Column to speed up the process. (Watch a video tutorial here)
Assign Raw Data Files
Sequencing experiment
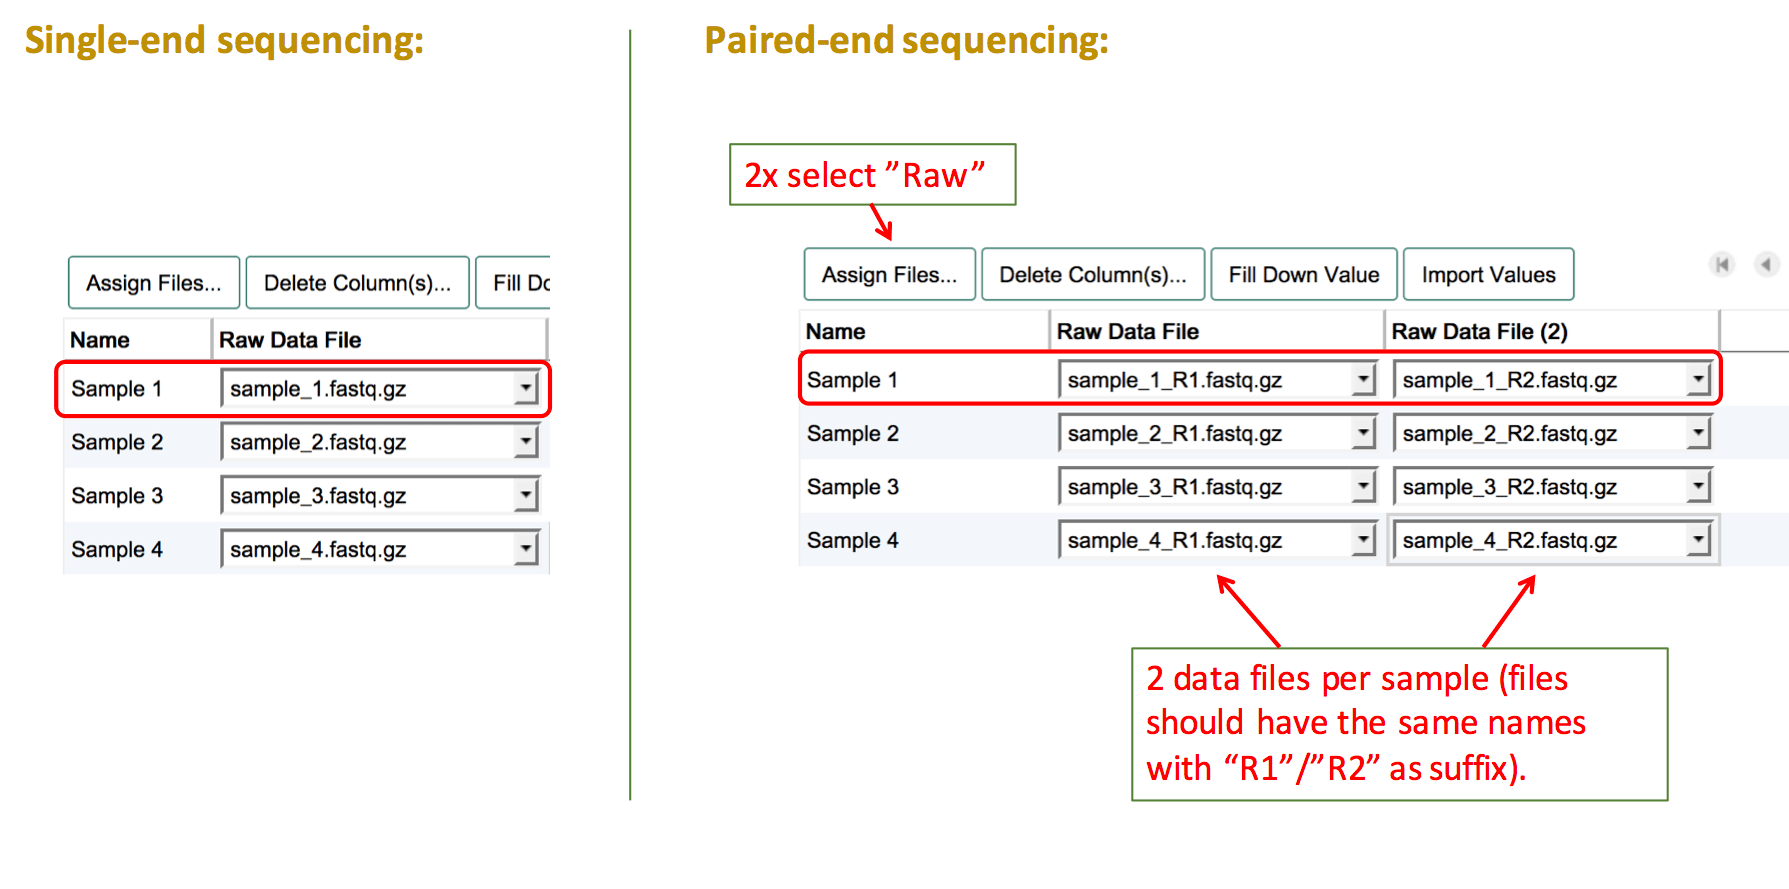
Sequencing experiments should contain individual sequencing raw read files for each sample. To assign raw sequencing files, select the file type "Raw". Then fill the columns with the names of the corresponding file for each sample.
For experiments using paired-end sequencing, two individual raw read files should be provided. To assign both files to one sample, create two "Raw" data file columns by clicking on Assign Files... twice. Then link the two corresponding sequencing files to each sample.
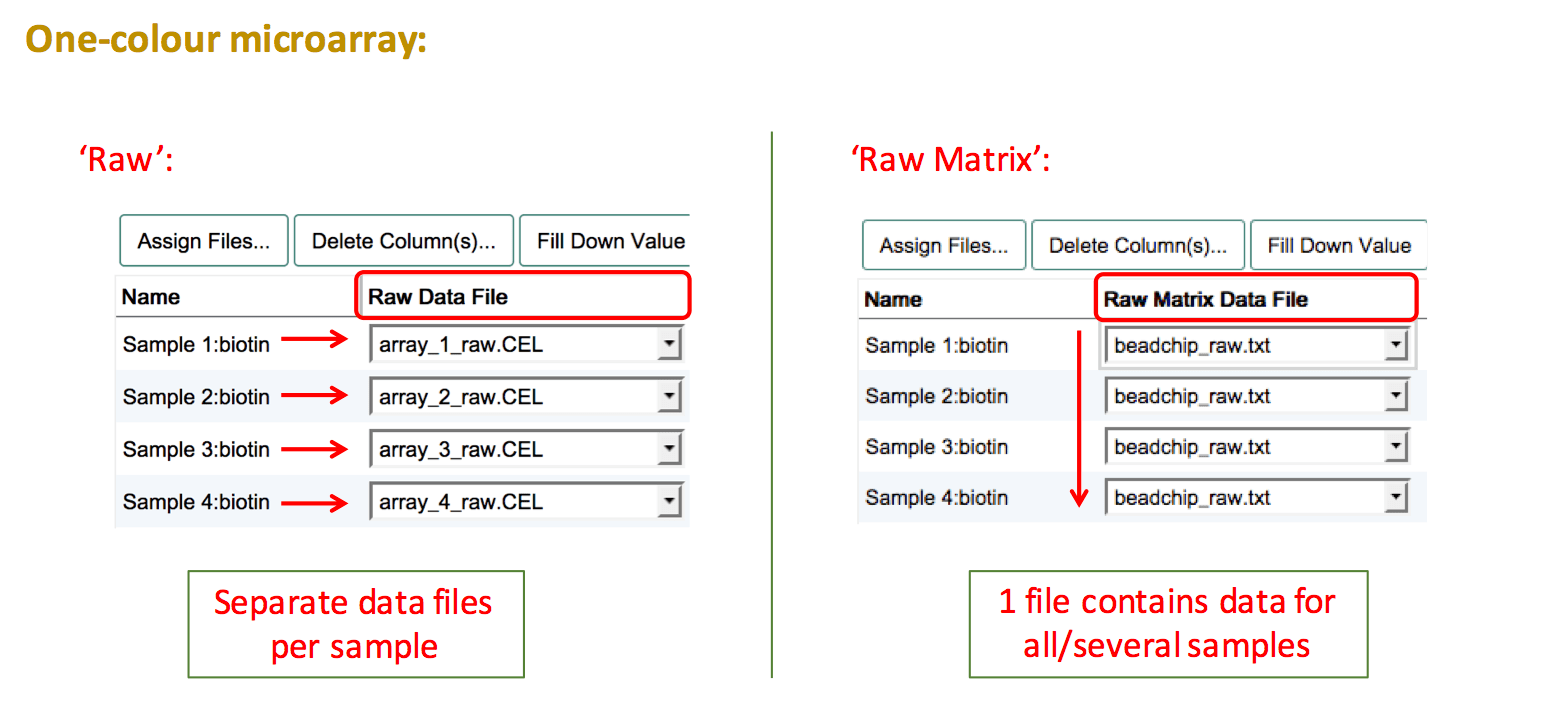
One-colour microarray experiment
For one-colour microarray experiments the raw output files can be either individual files per sample or a matrix file (e.g. Illumina arrays).
If you have individual files per sample, create a "Raw Data File" column and assign each sample to the respective file. For raw data matrices, all samples need to be linked to the same data file. To do so, create a "Raw Matrix Data File" column and select the name of the matrix file. Use Fill Down Value to propagate the file name to all samples.
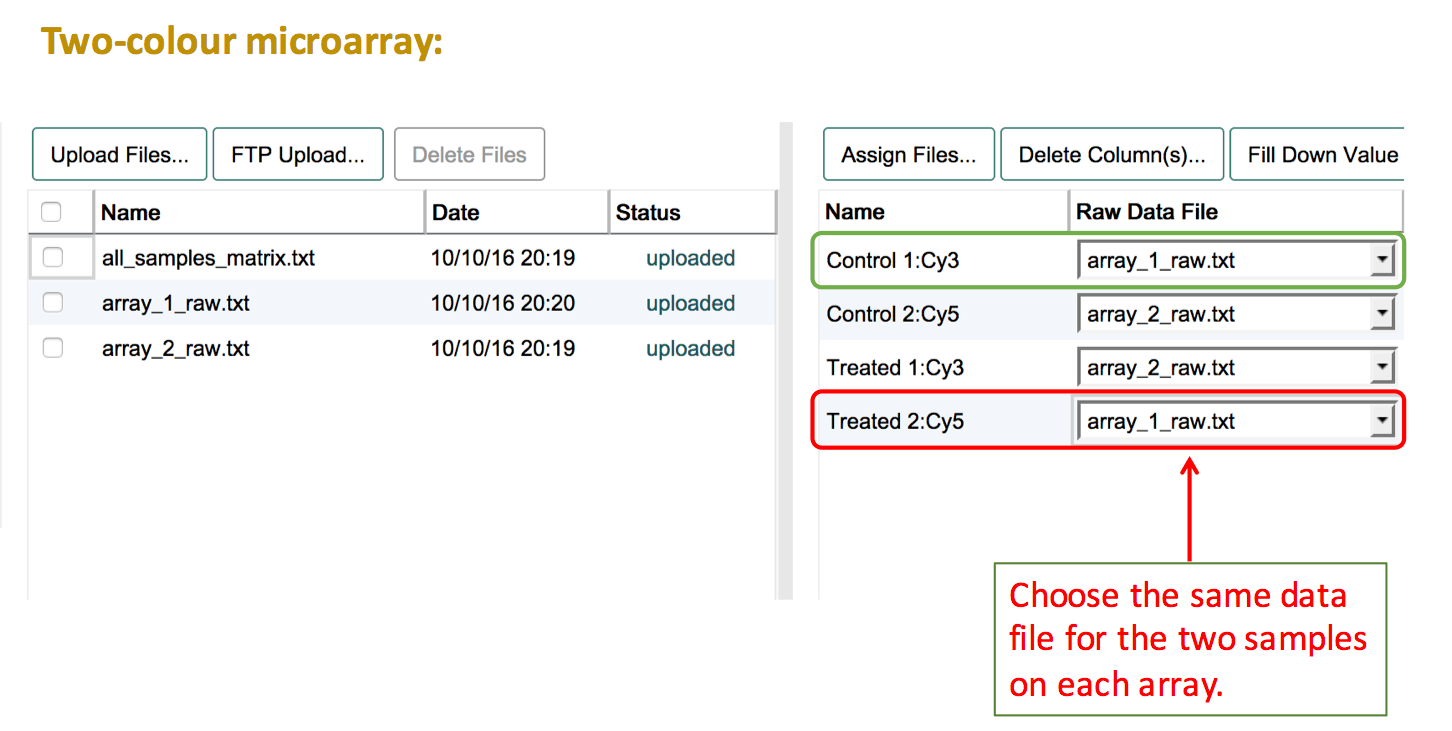
Two-colour microarray experiment
Two-colour microarray experiments need extra attention when assigning data files to samples. The basic assumption is that the data for both channels are stored in the same file (2 samples → 1 hybridisation → 1 file). See the two-colour microarrays help page for more details.
The basic steps are:
- Before assigning data files make sure to select the correct label for each of your samples. The panel on the right presents a list of the labeled extracts (Sample:Label combinations) that have been created.
- Press Assign Files... and create a "Raw Data File" column.
- Select the same file name for the two labelled extracts that belong to the same hybridisation. This should always be one Cy3-labelled extract and one Cy5-labelled extract that are connected via the same file name.
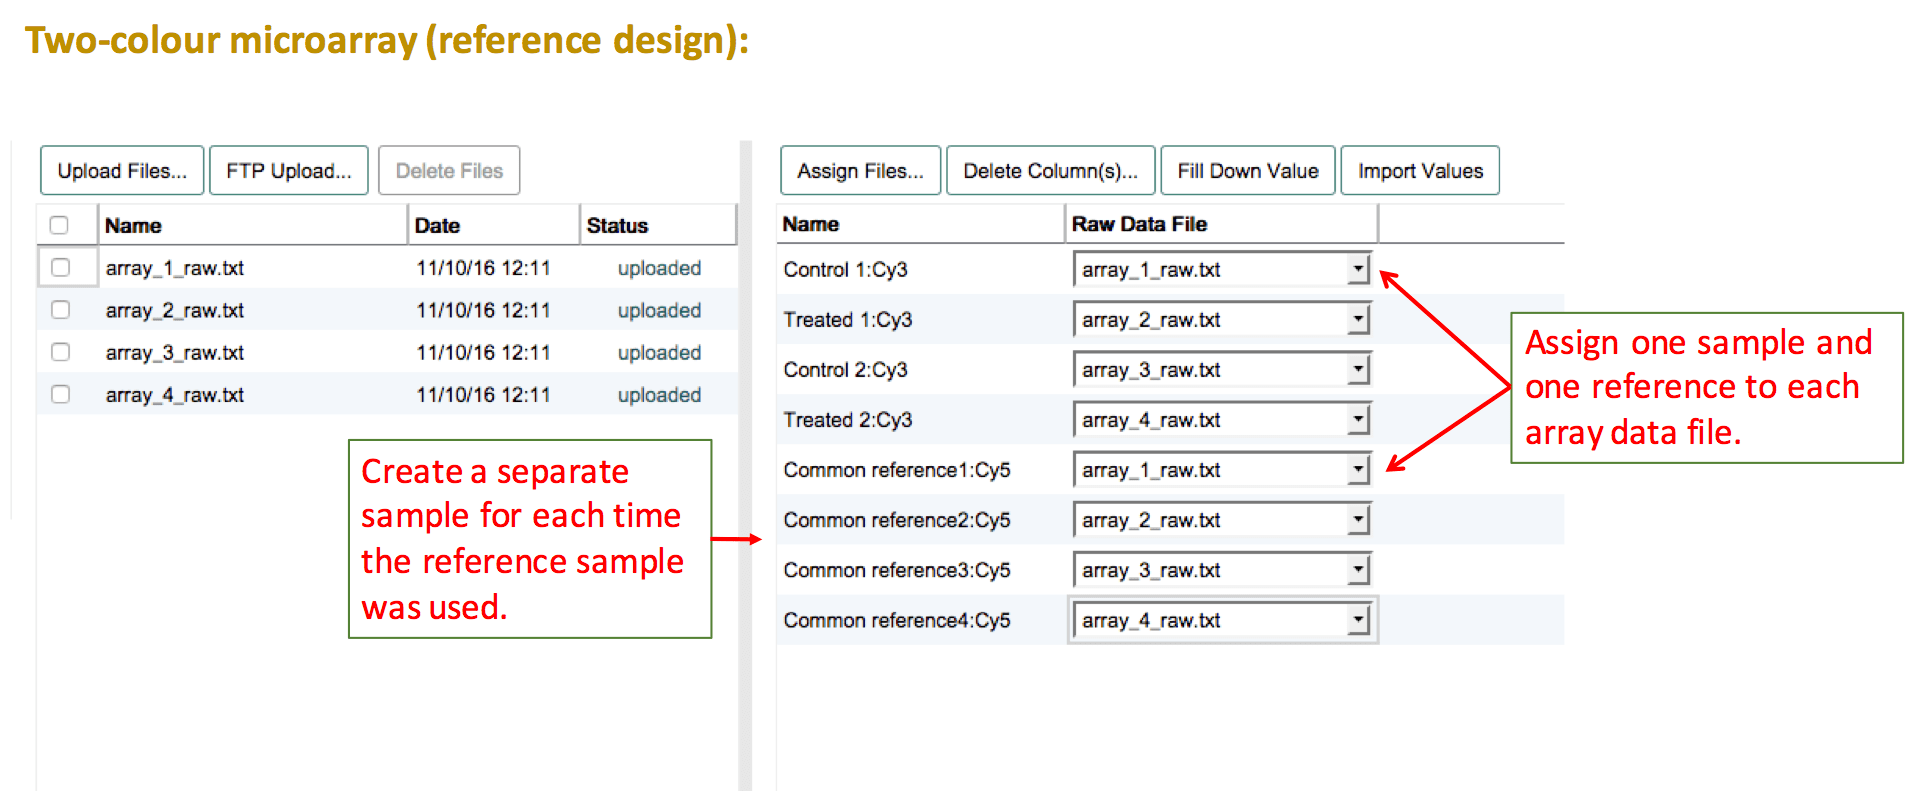
For two-colour microarray experiments that use a common reference sample, the reference sample needs to be duplicated for as many times as it was used on an array. Then assign each test sample and one of the reference samples per file. If the numbering of the reference sample should be removed, leave a comment about this in the feedback dialogue after submission.
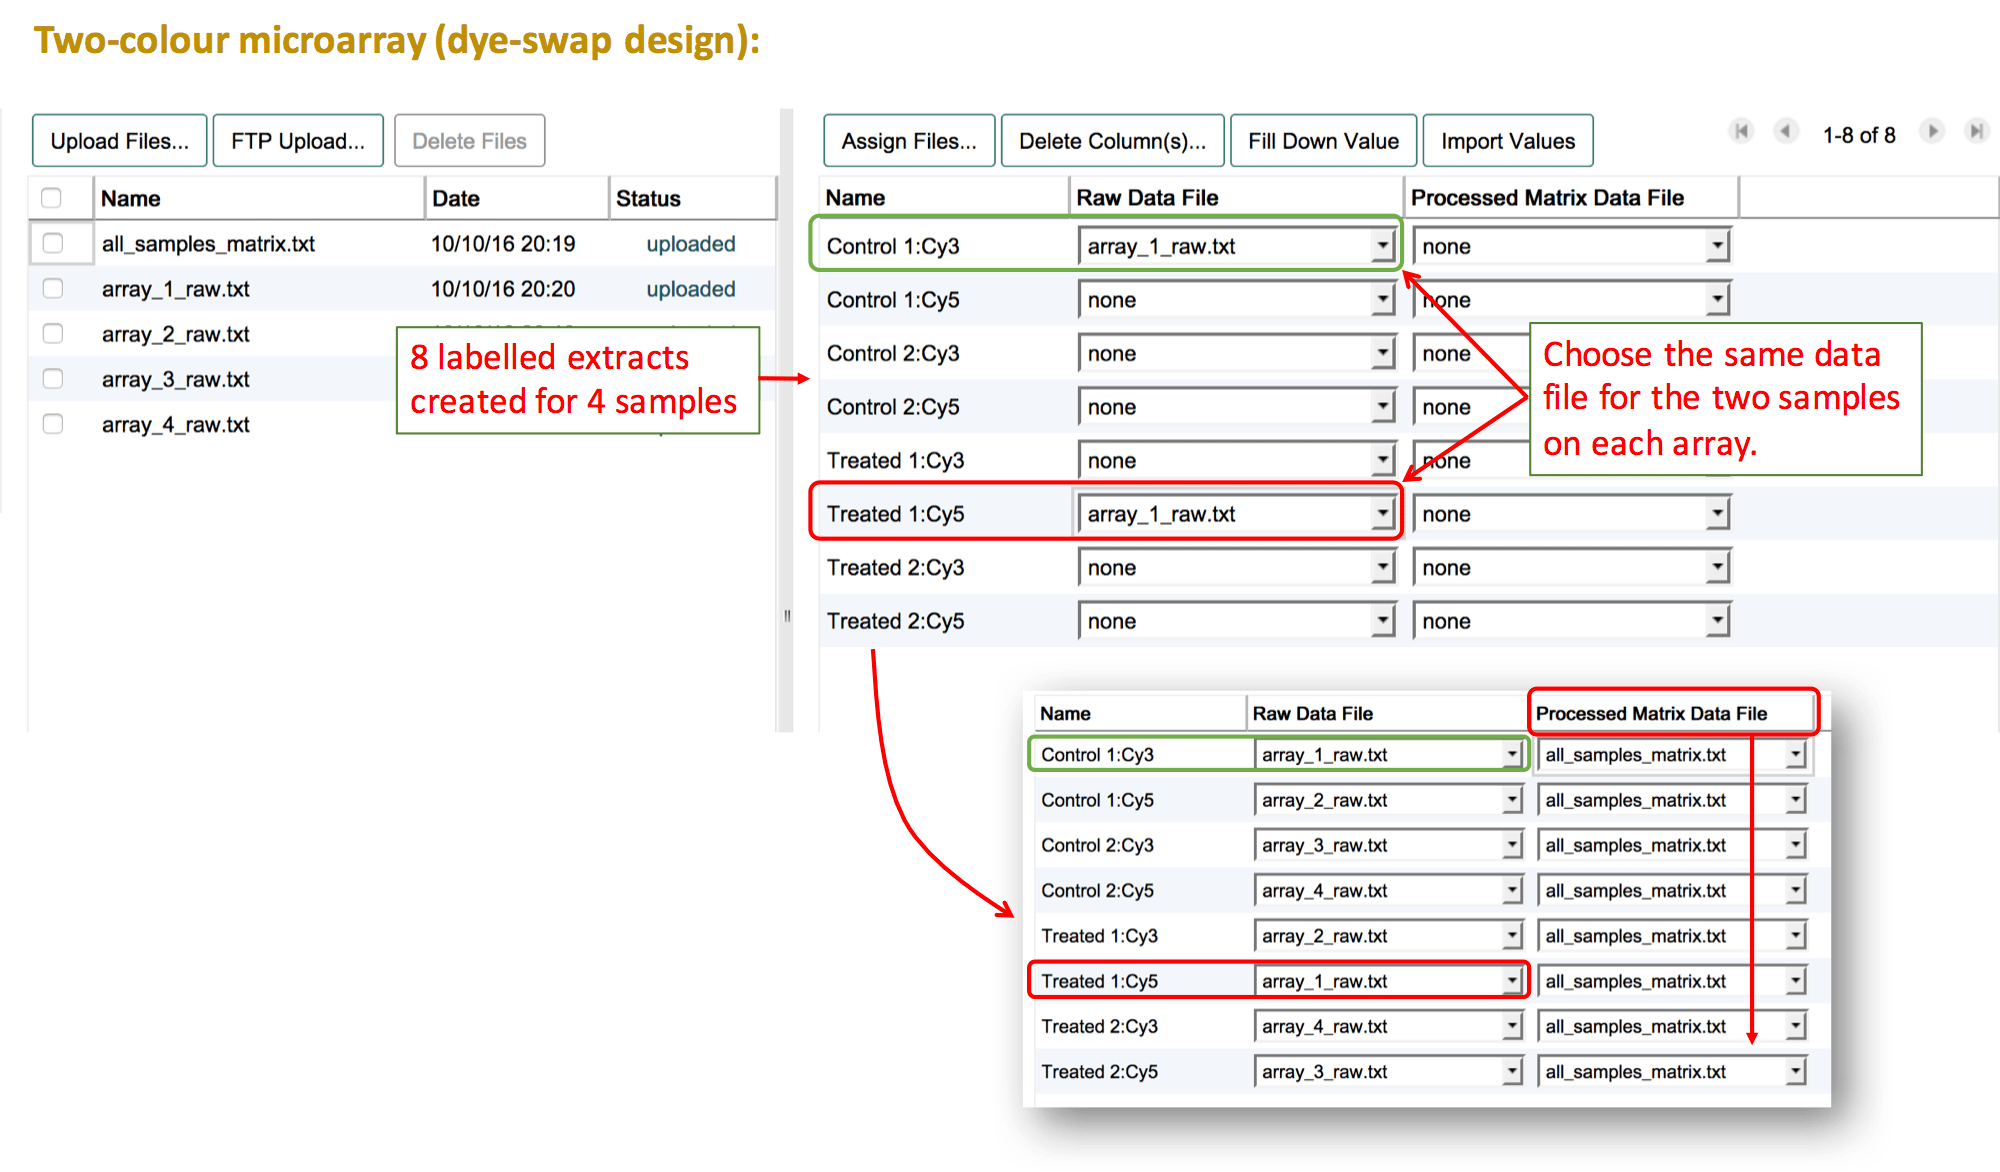
For a dye-swap design, leave both labels selected for each sample in "Create labeled extracts and assign labels". The list of labelled extracts should show each sample twice, each time with the respective label. Follow the same instructions as above to link the data files.
Assign Processed Data Files
"Processed" data refers to all data files and formats that are derived from the raw files and have been manipulated in any way (e.g. background correction, log2 transformation, normalisation, read trimming).
To add processed data files, create another column by pressing Assign Files.... Then select "Processed" if you have a separate file for each sample, or "Processed Matrix" if you have a file which contains processed data for more than one sample. Proceed to select the filenames of your uploaded processed data files for the relevant sample(s).
If you would like to include any other additional data types, please upload the files and leave a note in the feedback dialogue after submission, and a curator will add the files as supplement to the submission.
Technical Replicates
Sequencing experiment
There are two different types of technical replicates:
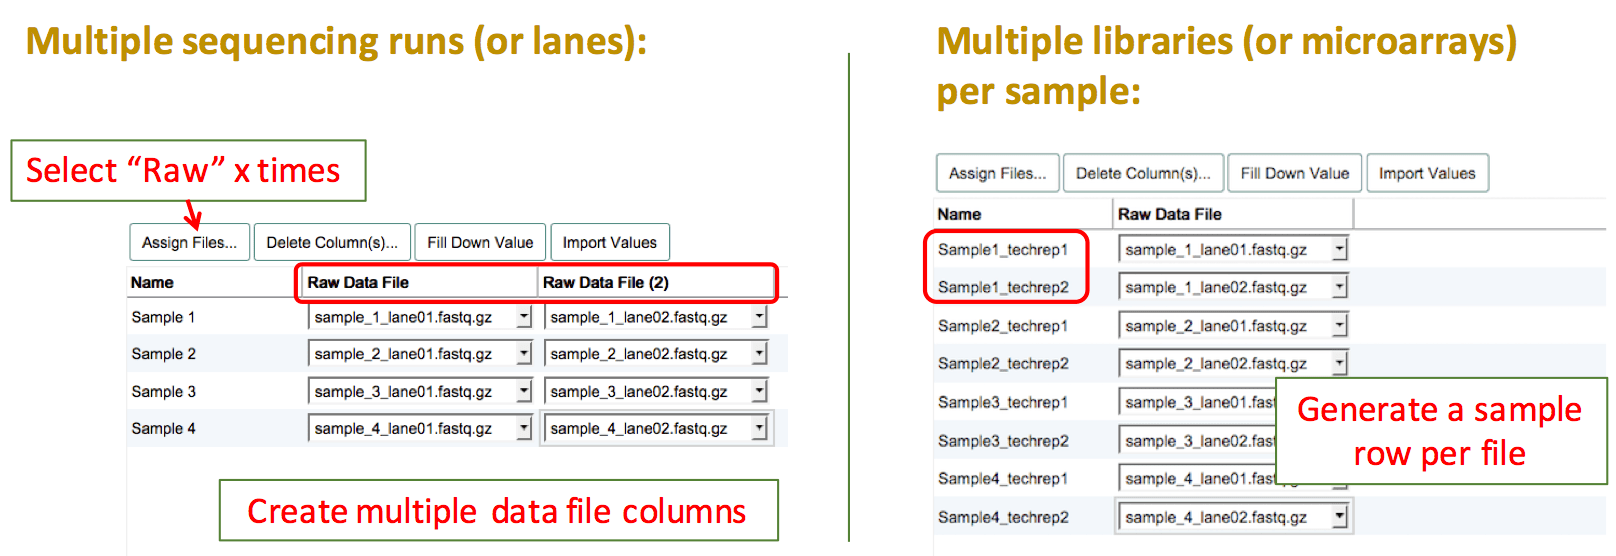
- Multiple libraries prepared from the same sample material (RNA/DNA extract): Create multiple sample rows and clearly name them with a suffix like "_library1", "_library2". This way you can also assign different library specifications to each library.
- The same sequencing library run on multiple lanes of a flow cell (this also includes multiple sequencing runs of the same library): Create as many "Raw Data File" columns as you have files per sample/library, to be able to assign all files to the same sample/library.
Microarray experiment
If the same biological sample was tested on two different arrays, please create separate sample rows and assign one file to each of these technical replicates. Name your replicate samples with the same prefix and then add e.g. "_techrep1"/"_techrep2".